If you’re a participant or commenter in the Student Blogging Challenge, you might want to add the new 2020 badge to your blog!
Badges are generally added to the sidebar of blogs but can also be added to About pages.
The 2020 Badges
Here is the badge for participants
![]()
Here is the badge for commenters
![]()
Two Ways To Add The Badge To Your Sidebar
You can right-click the badge above and click on ‘Save as’ to save it to your computer. From there, you can follow the instructions below to add the badge to your blog.
We will explain how to add your blog to your sidebar by:
- Pasting the image code into a Text Widget (easiest method for Edublogs Pro/CampusPress users) OR
- Using the Image Widget
These instructions apply to Edublogs and CampusPress users. If you’re using a different blogging platform, you’ll need to look for your specific instructions.
We’ve added links to some help guides on our Blog Help page.
Adding A Badge To Your Blog’s Sidebar Using The Custom HTML Widget
Note: This is an easy way to add the badge but will only work for Edublogs Pro blogs (or student blogs attached to an Edublogs Pro account), or CampusPress users. Embedding isn’t available on free blogs due to misuse by spammers.
1. In your blog’s dashboard, go to Appearance > Widgets.
2. Drag over a Custom HTML widget to your sidebar.
3. Give the Custom HTML a title if you wish, for example: ‘Student Blogging Challenge’ or ‘I’m taking part in the Student Blogging Challenge’
4. Copy and paste the following code into your widget:
Code for participant badge
<a href="https://studentchallenge.edublogs.org/"><img src="https://studentchallenge.edublogs.org/files/2020/02/2020-STUBC-Badge.png" alt="Student Blogging Challenge 2020" width="300" height="295" class="alignnone size-full wp-image-2614" /></a>
Code for commenter badge
<a href="https://studentchallenge.edublogs.org/"><img src="https://studentchallenge.edublogs.org/files/2020/02/STUBC-Badge-Commenter.png" alt="Student Blogging Challenge 2020" width="300" height="295" class="alignnone size-full wp-image-2614" /></a>
It should look like this:
![]()
5. Click Save.
Adding A Badge To Your Blog’s Sidebar Using The Image Widget
Video Instructions — Image Widget
Here is a 3 minute video that walks you through the process of adding the image widget. This video shows you the process using a Windows computer. You can adjust the instructions for your own operating system.
(Note, this video uses the 2018 badge and the colouring of my widget at the end is not right but you won’t have this issue!)
Written Instructions — Image Widget
Don’t want to watch the video? Here are the written instructions:
1. Right click on the image of the badge you need above and choose ‘Save as’. Save it to your computer (e.g. in My Pictures). Alternatively, click here to download the participant badge or click here to download the commenter badge.
2. Log in to your blog’s dashboard and go to Appearance > Widgets.
3. Add an Image Widget to your sidebar by dragging it over and positioning it where you’d like it on your sidebar.
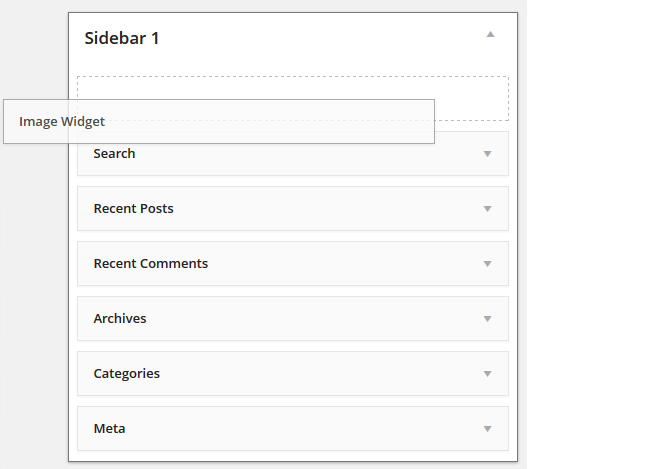
4. Click on Add Image.

5. Click on Upload Files and then Select Files. Find where you saved the image on your computer and then click Open to upload the image.
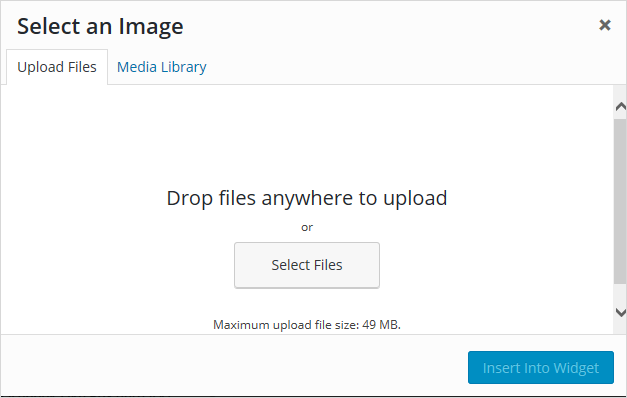
6. Select your uploaded image and then click Insert into Widget.
![]()
7. Add your Title — e.g. ‘Student Blogging Challenge’ or ‘I’m taking part in the Student Blogging Challenge’.
Then add a Link to the Student Blogging Challenge blog https://studentchallenge.edublogs.org (so anyone interested in the challenge can easily click through).
You can also select Open New Window if you want visitors to stay on your blog when they click on the badge.
Finally, click Save.
![]()
8. You should now see your badge on your sidebar!
![]()
Need Help?
Any questions? Leave a comment on this post. Or, if you’re using Edublogs/CampusPress and you run into difficulties, send our support team and email and they’ll be able to help you out. You can contact them via this form.
Good luck!