Week 4: Emojis
You’ve been working hard to learn about some important topics for the first three weeks. Well done!
Let’s have some fun with emojis!
Week Three Recap
 There were so many great posts submitted again by classes and students.
You can find them all here (or click on the red box on the sidebar).
Let’s take a look at just some of the fantastic work we spotted last week:
- Georgia summarized the places you can find images and included a slideshow.
- Mrs. Kimball made a Halloween themed slideshow for her class that included some information and tasks. There’s also the beginning of a story that others can complete.
- Eshaan invites you to complete the story of when dolls come alive!
- There’s a great farewell to summer poem on Frog’s blog.
- Emily asks you to guess her sentence.
- Nightshadebloom shared her own artwork.
- Chris explains why you can’t take images off Google.
- Emmitt shares some favourite images in a slideshow.
Remember, you can view more great work on our 2018 Student Blogging Challenge Flipboard.
Reminders
Here are a few general challenge reminders:
- Please remember to keep approving the comments on your blog quickly — it keeps the conversations going!
- Haven’t caught up on the first three weeks? Don’t worry! You can complete your tasks late, or skip some tasks. Please submit your task in the correct form (e.g. if you complete a task from week one, go back to the week one post and add it to the form).
- Posts that are proofread and written in short paragraphs are much easier to read! Need help with proofreading? Try a free tool like Grammarly. Note: Grammarly is 18+ but if you’re aged between 13-17, you can use it with permission.
Let’s dive into this week’s topic…
Emojis
Do you like emojis? 😎😁😍
Emojis were first used on mobile phones in Japan in 1999 and become popular worldwide about ten years later.
Before emojis were emoticons (or smileys). Emojis are different to emoticons. Emojis are pictures, whereas emoticons are the punctuation you use to symbolise emotion.
Emojis look different depending on what sort of platform or device you’re using. As Emojipedia tells us,
Emoji is a standardised set of characters that is available on iOS, Android, Windows and macOS. While the artwork for each emoji character varies by platform, the meaning of each symbol remains the same.
Two years ago, a report stated that 92% of internet users use emojis. No doubt this number has grown now.
The great thing about emojis is that they’re a universal language! They can help people communicate, even if they don’t speak the same language!
More Emoji Fun Facts!
- The original 176 emoji are on display at New York’s Museum of Modern Art.
- There are now 2,823 emojis.
- New batches of emojis are added every year.
- Oxford Dictionary named the Face with Tears of Joy Emoji 😂 as the 2015 Word of the Year.
- The Face with Tears of Joy is the most popular emoji. Twitter tracks the most popular emojis here.
- Emoji or emojis? In Japanese the plural is emoji but both are accepted in English.
Sources
Help With Emojis
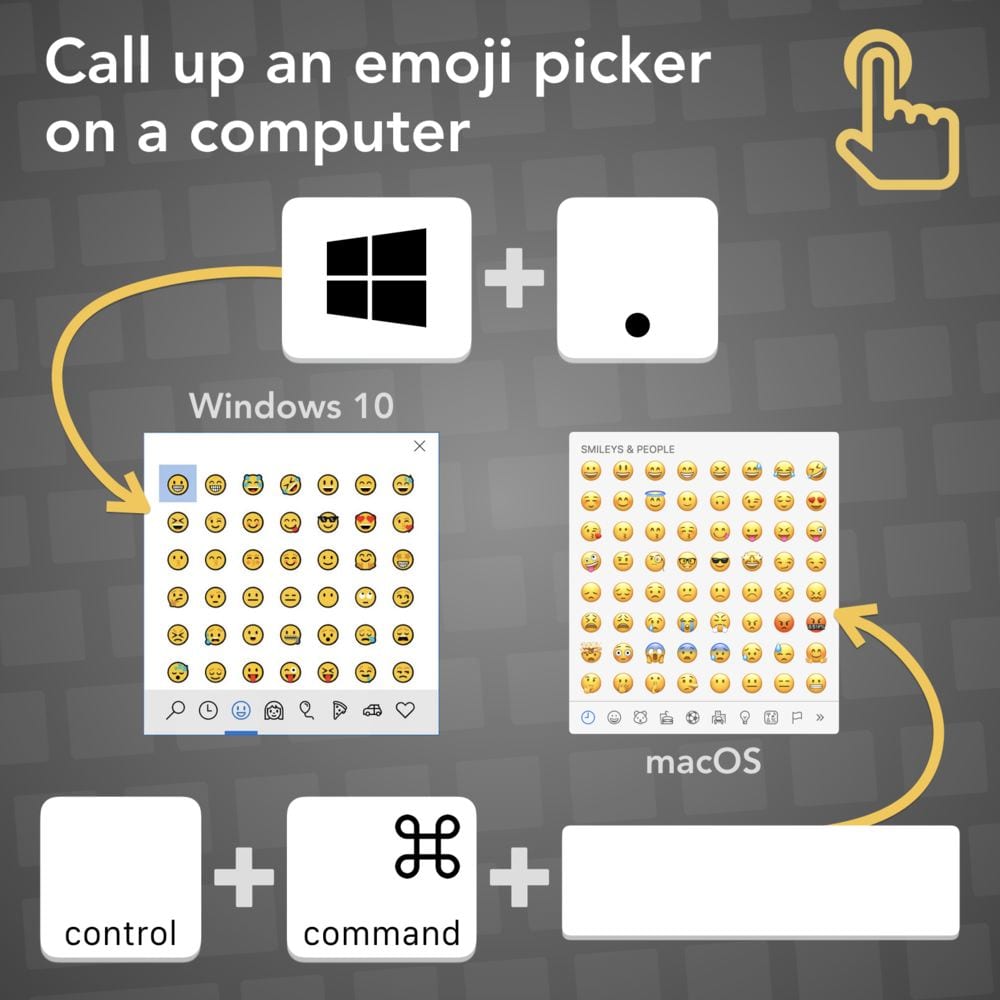
If you’re using Windows 10 or a Mac computer, there is a simple way to choose an emoji as Tony Vincent demonstrates in the graphic below.
Call up an emoji keyboard in Windows 10 by holding down the Windows key and pressing period (full stop). Holding down the Windows key and the ; key also works.
On macOS, hold down Control and Command and press the space bar to make an emoji picker appear.
Both of these keyboard shortcuts require the cursor to be in a text box.
 Not sure how to use emojis on your iPad? Check out this article.
Week Four Tasks
This week there are four fun tasks to choose from to get creative with emojis.
Our graphic summarises the tasks and I will explain each task in more detail below. I’ve included some examples and ideas for how classes can approach each task.
As this topic hasn’t been used as part of STUBC before, we don’t have actual student examples to show you this week.

Task 1: Emoji Story Prompt
Thank you to Tony Vincent for this great idea about using emojis to help you create a story.
- Go to byrdseed.com/emoji. You’ll see one random emoji on the screen.
- Press “And then…” to add some more inspiration for your story with new emojis.
- If you don’t like the emojis, just press “Start over”.
- Write your story in a blog post. If you prefer, you could make an audio recording or even a video.
- You could ask your visitors to finish your story in a blog comment if you like.
Don’t forget a screenshot:
Take a screenshot of your emojis to add to your blog post so your visitors can check out your inspiration.
- This article shows how to take a screenshot on any device.
- Click here to find out how to add an image to an Edublogs or CampusPress blog.

If you’re working as a class on this activity, perhaps students could make individual stories and the teacher could add them to a series of blog posts or a Google Slide presentation.
- Check out Alethea Vazquez’s tutorial on how to put a Google Slides presentation together.
- If you need more help with making a collaborative Google Slide presentation, check out this video from Matt Miller.
Task 2: Emoji Guessing Game
There are lots of ways you can use emojis to make fun guessing games for your readers
Emoji Quiz
Make a quiz for your readers using only emojis.
Have them guess something like:
- Book title
- Movie title
- Book/movie character
- Food
- Word
- Phrase
- Country
- Idiom
You could present this however you like — as a simple blog post, a video, a Google Slide presentation. Or you might have other ideas.
Here’s an example of a video where viewers are asked to guess the Disney movie.
If you add emojis to a blog post like I’ve done below, they’ll be quite small.
🐟 + 🍟 = ?
Quick tutorial: Make an image
If you want a simple way to present your emojis so they’re larger, try making an image in Google Drawings or Google Slides. Google Drawings has a transparent background by default and Google Slides has a white background by default.
- Go to Google Drawings or Google Slides and open a blank presentation.
- Add a title (press on T in the toolbar in Google Drawings).
- Add the emojis you want. If you’re on a computer, try going to Emojipedia or EmojiCool and copying/pasting the emojis into your Slide/Drawing.
- When your Slide/Drawing is done, go to File > Download as > PNG image (or JPEG image). Save the image to your computer.
- You can then upload the image to your blog post (here are the instructions for Edublogs/CampusPress users).
Here is an example I made:

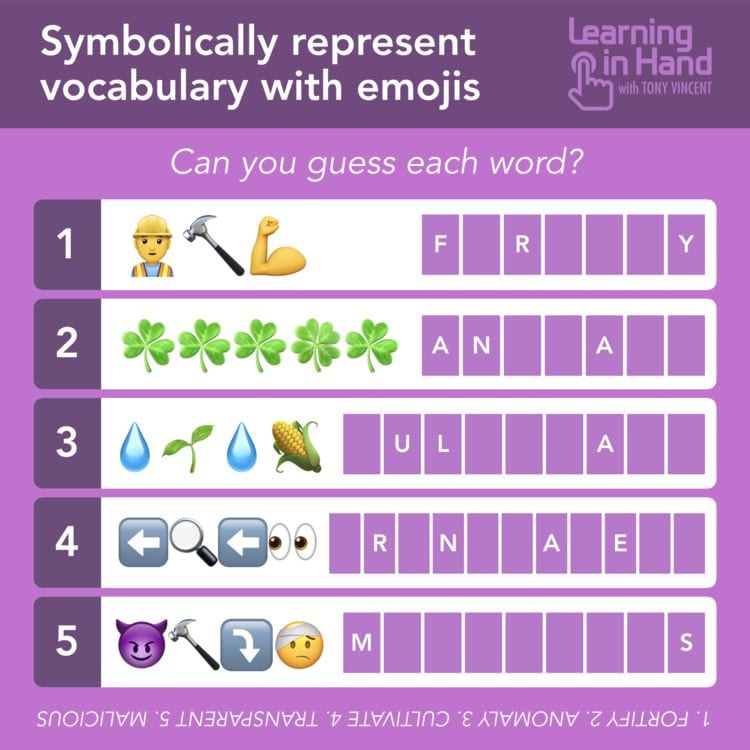
Guess The Word
Tony Vincent demonstrates how to make a Guess The Word emoji puzzle in this graphic.
Want to make something like this? You could try a tool like Google Drawings, Google Slides, PowerPoint, or Canva. Just save your creation as a PNG or JPEG and upload it to your blog like any other image.
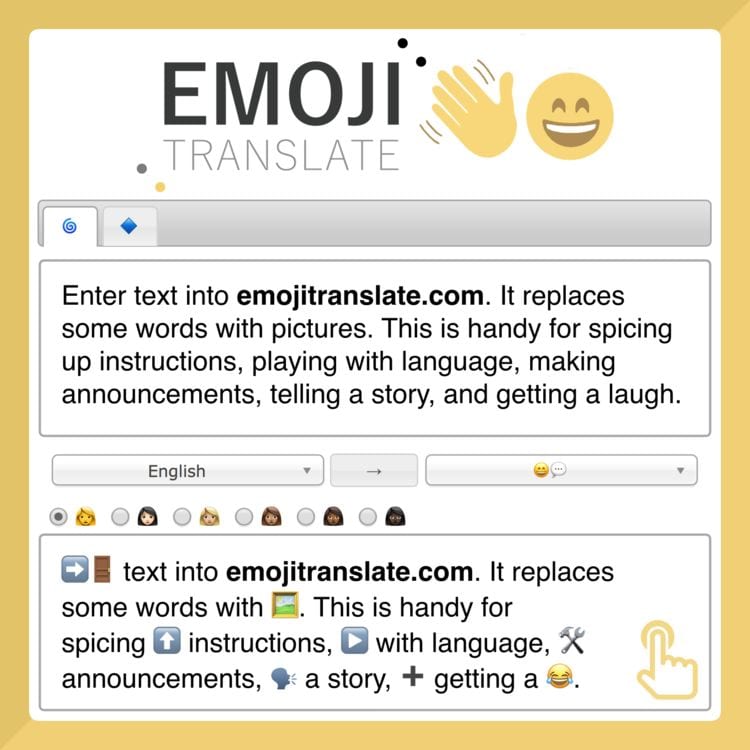
EmojiTranslate
Here’s yet another idea from Tony Vincent.
- Write out a blog post as you normally would. This could be about anything — a pet, a school event, a favourite sport. The choice is yours.
- Copy your blog post text. Go to emojitranslate.com and paste your text in the box.
- Some words will be replaced with pictures. If you don’t want to use some of the emojis, just re-type the word.
- Take a screenshot of your result and add it to a blog post.
- Ask your readers to guess what it says in a comment.
You don’t have to use EmojiTranslate. You can always just make your own post and substitute some words for emojis.
If you’re working as a class on these activities, all the students could make their own image and the teacher could compile them into a Google Slide presentation or simply add them to a blog post (or series of posts). Or students could work together to make videos.
Remember, last week Alethea Vazquez made a tutorial on how to put a Google Slides presentation together if you need help with that.
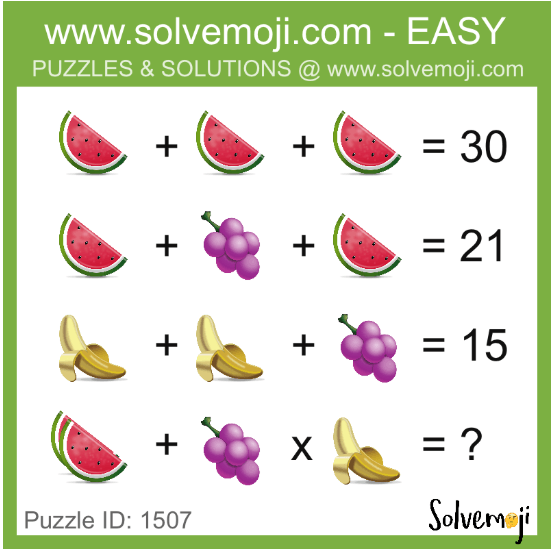
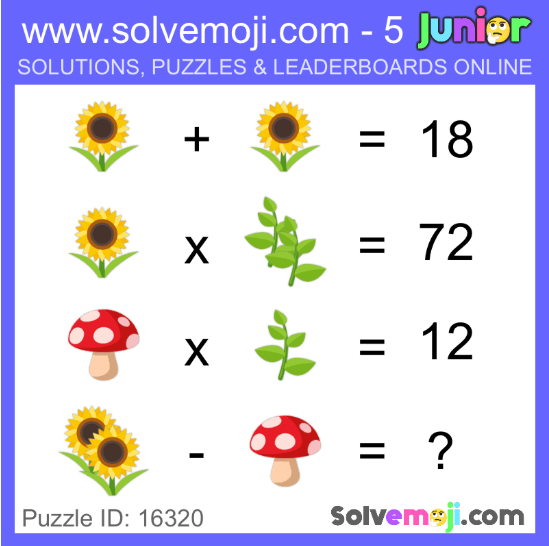
Task 3: Emoji Maths
Emojis aren’t just about writing. They can be fun to use in maths too!
There’s a popular site called Solvemoji.com where emojis are used in maths puzzles.
- You could try making your own puzzles using a tool like Google Drawings, Google Slides, PowerPoint, or Canva. Just save your creation as a PNG or JPEG and upload it to your blog like any other image.
- You could draw you puzzles on paper, take a photo of them and add them to your blog post.
- Instead of making puzzles, you could solve some of the puzzles on Solvemoji.com and write your solutions and reflections in a blog post.
Here are some examples from the Solvemoji.com website.
If you’re working as a class on this activity, all the students could make their own puzzles and the teacher could compile them into a Google Slide presentation or simply add them to a blog post (or series of posts). The students could solve the puzzles in a blog comment.
Task 4: Emoji Art
Do you enjoy creating and making artwork?
There are a few ways you can make your own emoji:
- You could draw a picture of an emoji and take a photo of it then upload it to your blog post.
- There are lots of places online where you can find ‘how to draw’ emoji tutorials. For example, how to draw a peace sign hand on YouTube or how to draw heart eyes emoji on the How to Draw website. Under 13s should check with an adult.
- If you have an iPad, you could use an app like Emoji Me Kids to make an animated emoji of yourself.
- You could design an emoji in a program like Google Drawing or Google Slides. See the instructions listed in task two.
- You could try Google’s Made With Code Emoji Project. This is lots of fun!
- You could use emoji.ink to create an artwork using emojis. Tip: Use the slider in the bottom right corner to change the size of your emojis. Take a screenshot when you’re done.
- You might have other ideas!

Add your artwork to a blog post with a description. Don’t forget to include an explanation of how you made it and a link to a tool if you used one.
Final Tips
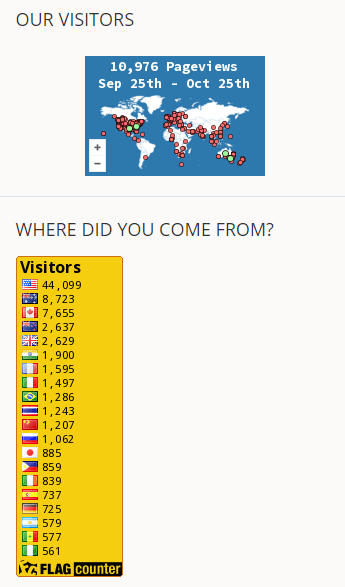 You will notice on the sidebar of the Student Blogging Challenge blog we have some visitor tracking widgets to see which countries our visitors are from.
You can add these to your sidebar too. Find the instructions for Edublogs and CampusPress users here.
Because you need to use embed code, you’ll only be able to add these visitor tracking widgets with an Edublogs Pro or CampusPress blog. Embed code isn’t enabled on free blogs to prevent misuse by spammers.
Using a different blogging platform?
- You’ll find the instructions to add Clustrmaps here and there are instructions to add RevolverMaps here.
Not getting many visitors?
Try visiting other people and inviting them to visit your blog.
If you look on the sidebar of the Student Blogging Challenge blog, you will see the links to the tasks that participants completed for the first three weeks.
Choose some people to visit. Make your comment a high quality one — proofread it, ask a question, and show a genuine interest in the blogger. Then leave the URL of a post you’d like them to check out.
Which approach do you think would come across better?
Comment one
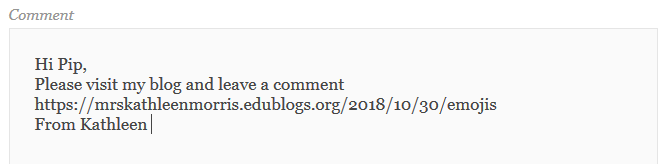
Comment two

Check back to see if the blogger replied to you too (if possible, tick the box to be notified of follow-up comments).
If you keep visiting a few of the same people over the coming weeks, you could really get to know each other!
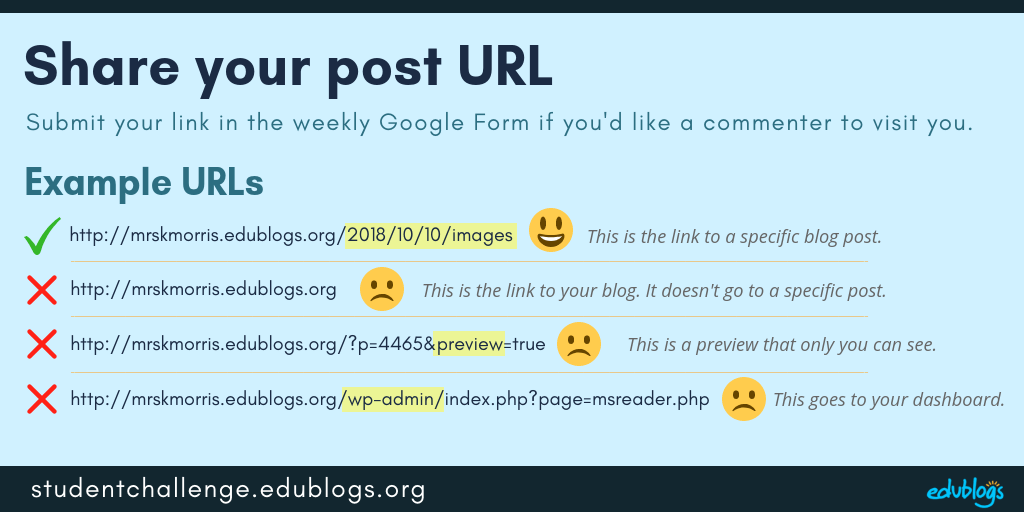
Submit Your Post URL ⬇
If you want a commenter and other participants to visit your blog, remember to fill in the Google Form below with the URL of the post you published for this week’s task.
If you complete more than one task, please choose your favourite one to submit.
Remember to include the URL of the actual post. This graphic below should help you understand what a post URL looks like if you’re using Edublogs/CampusPress/WordPress.
 The Google Form

Edit: This form is now closed but feel free to still complete the tasks!
Next week’s topic: Similarities and differences around the world 🌏
What's on this page?
11 comments on “Week 4: Emojis”
Hi Kathleen,
Thanks so much for all your hard work on this. I can’t imagine how much time and effort it must take! This is my first year blogging myself and am trying it with my 7th grade students too. We’re having so much fun and learning a lot about digital literacy. I’ve submitted posts on our class blot for both weeks 2 and 3, but don’t see our class in the spreadsheet (http://fbmsblogger7.edublogs.org/). I submitted them on Saturday, so is that too late for the week?
G’day Mrs Greene,
There have been lots of posts from students with Mrs Greene or Green as their teacher. On week 3 I can see one from fbmsblogger at number 356. I do delete any that are not correct URLs like http://fbmsblogger7.edublogs.org/ This URL takes me to your class blog, but not a particular post for the commenters to leave a comment on.
We leave the google forms open until Wednesday of the next week, so you get 10 days in which to add the URL of posts, but if you miss the deadline put them in the form for the next week.
This is really cool i didn’t know that you can do all those diffrent things with emoji’s!
https://matthew101805.blogspot.com/
This weeks blog challenge is to use emojis. 😀 👉 not really a huge fan of emojis but 😀 figured 😀 would give it a 🥃. 😀 challenge 😀 to ✍ a story 🇺🇸 emojis for every 🆔.
( also in the comments try to read the whole story word by word if you comment it correctly your blog will be linked to on the sidebar.)
Hi Matthew,
Thanks for sharing your post. I hope your readers enjoy submitting your story as a comment! 😎
Dear Kathleen Morris,
I tried to add a slideshow to my post for this week’s challenge. My slidshow was about guessing what food it was with emojis. When I added the slidshow to my post, all the emojis had either turned black and white or just turned into a square. I’m not sure what to do because the slidshow is an important part of my post. Do you have any suggestions?
Sincerely,
Zaprina
Hi Zappy,
Happy to help! How were you making your slideshow? Was it in Google Slides?
Maybe if there aren’t too many slides, you could try saving each one as a picture? Then you can upload the images to your post? To save your slides as a picture, open you Google Slides presentation, then go to file > download as > PNG image. Save it to your computer and add it to your blog post. Here are the instructions to add an image if you haven’t done it before. https://help.edublogs.org/add-images/
Let me know how you go,
Kathleen
Dear Kathleen Morris,
Thanks for the help! I did what you said and it worked. I made every page of the slideshow into a picture. If you want to see my post here is the link http://zappy12.edublogs.org/2018/11/08/48/
Thanks again!
Sincerely,
Zaprina
Hi Zaprina,
Your post is fantastic! Well done. You’ve been very creative. I’m sure others will enjoy solving your problems.
Let’s know if you need more help in the future.
Best wishes,
Kathleen
My class is loving this week’s blogging challenge! I wanted to take the time to thank everyone for their efforts to make this challenge such a great experience!
Hi Brittani,
Thank you so much for taking the time to let us know! I hope the students’ enthusiasm for blogging continues! 🙂